Abstract
You know how to make new colors by mixing paint or crayons. For example, you get green by mixing yellow and blue, or orange by mixing red and yellow. With paint, blue, yellow, and red are primary colors, which you can use to make other colors. Have you ever tried making colors with light? Are the primary colors the same ones you use for paint? Do this experiment and find out.Summary

Objective
The goal of this project is to learn some basic principles of color perception by experimenting with various combinations of colored lights.Introduction
The process of seeing begins with light-sensitive cells at the back of the eye called photoreceptors. People have two main types of photoreceptors, called rods and cones because of the shapes of the light-sensitive parts of the cells. Rod photoreceptors are more sensitive and respond faster than cones. They are used in dim-light conditions. Cone photoreceptors are essential for color vision. They are used in bright-light conditions.
In the central part of the eye there is a circular area packed densely with cone photoreceptors (no rods), called the fovea. This is the region of your eye that you use most of the time. Any visual task that requires seeing fine details (reading the letters on this webpage, for example) uses the fovea.
How does color come into this? You've seen white light refracted by raindrops or diffracted by the shiny surface of a CD to make a rainbow of colors. The rainbow shows the spectrum of visible light. The different colors that you see in a rainbow correspond to light with different amounts of energy. The light at the blue end of the rainbow has slightly more energy than the light at the red end of the rainbow.
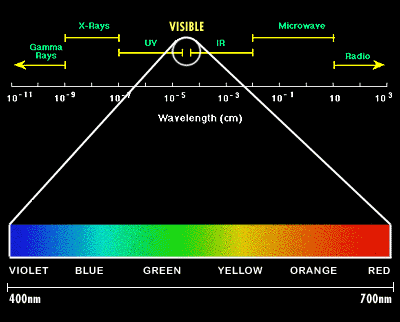 Image Credit: Abrisa Glass and Coatings / Copyrighted
The electromagnetic spectrum extends from very short wavelength gamma rays to very long wavelength radio waves. The visible spectrum of light appears between UV and Infrared light in Wavelengths between 400 and 700 nanometers. Light in the visible spectrum (Violet, Blue, Green, Yellow, Orange and Red) makes up a very small portion of the electromagnetic spectrum.
Figure 1. The visible spectrum. X-rays, light, and radio waves are examples of electromagnetic waves. Light is the part of the electromagnetic spectrum that we can detect with our eyes. Cone photoreceptors have evolved so that they are most sensitive at different regions of the visible spectrum. This forms the basis for our sensation of color (Illustration from Abrisa Glass & Coatings, 2005).
At the blue end of the visible spectrum, the wavelength of light is shorter—about 400 nanometers. (A nanometer is 1 billionth of a meter, or 1 x 10⁻⁹ meter. The abbreviation for nanometer is 'nm'.) At the red end of the spectrum, the wavelength of light is longer—about 700 nm.
Cone photoreceptors have evolved into three different types. Each one is most sensitive to a different region of the visible spectrum. One type responds best to shorter wavelengths; another responds best to wavelengths towards the middle of the spectrum; and the third type responds best to longer wavelengths. The different cone photoreceptors are not sharply tuned to a particular color, however. So a short-wavelength cone photoreceptor can still respond to longer-wavelength light that falls on it. It is more likely to respond to shorter wavelength light, but it is still possible for it to respond to mid- and long-wavelength light.
The signals from the three different types of cones are combined in the retina and in the brain, eventually giving rise to the sensation of color. In this experiment, you will use different combinations of light to investigate color sensation. You will be working with three different lights: red, green, and blue, mixing them in different combinations. If you're only used to making colors with paint, you may be in for some surprises!
Terms and Concepts
To do this project, you should do research that enables you to understand the following terms and concepts:- Photoreceptor
- Rods
- Cones
- Wavelength
- Spectrum
- Perception
Questions
- Identify the region of the visible spectrum for red light, green light, and blue light.
- What color do you see when you mix red light with green light?
- What happens when you make the red light dimmer?
- What happens when you make the green light dimmer?
- What color do you see when you mix red light with blue light?
- What happens when you make the red light dimmer?
- What happens when you make the blue light dimmer?
- What color do you see when you mix green light with blue light?
- What happens when you make the green light dimmer?
- What happens when you make the blue light dimmer?
Bibliography
- You can read more about how we sense colors at this site:
- Cooper, K. and C.J. Kazilek, date unknown. Seeing Color, Ask a Biologist, Arizona State University. Retrieved March 5, 2007.
- The visible spectrum illustration in the Introduction is from:
Abrisa Glass & Coatings, 2005. Understanding Light and Color, Abrisa Glass & Coatings. Retrieved March 5, 2007. - To learn more about light and the visible spectrum, see: Wikipedia contributors, 2007. Visible Spectrum, Wikipedia, The Free Encyclopedia. Retrieved March 5, 2007.
Materials and Equipment
To do this experiment you will need the following materials and equipment:- 3 flashlights; notes:
- Any flashlight will work for this project, but it is best if the brightness of each flashlight is about the same.
- If you are purchasing flashlights for this project, we recommend the "Mini Maglites" brand available from Amazon.com. These are rugged, have high output, and, most importantly, they can be focused. They are available in many stores, and from multiple online sources.
- Colored filters:
- You can make your own with transparencies and red, green, and blue colored markers ("Sharpie" brand works well), or
- you can purchase colored filters online from Amazon.com.
- Three identical, clear drinking glasses
- Wax paper
- Red, green, and blue food coloring
- Water
- Dark room with a white wall, a screen, or a large piece of white paper taped to the wall
- Table for holding glasses with colored water
- An assistant to help with mixing the three lights
Disclaimer: Science Buddies participates in affiliate programs with Home Science Tools, Amazon.com, Carolina Biological, and Jameco Electronics. Proceeds from the affiliate programs help support Science Buddies, a 501(c)(3) public charity, and keep our resources free for everyone. Our top priority is student learning. If you have any comments (positive or negative) related to purchases you've made for science projects from recommendations on our site, please let us know. Write to us at scibuddy@sciencebuddies.org.
Experimental Procedure
- Attach one colored filter over each flashlight, so that you have one red, one green, and one blue light.
- In a darkened room, project each light onto the wall separately and observe the color.
- Now choose two of the lights, for example red and green, and project them onto the wall so that their spots of light overlap. What color do you see where the spots overlap?
- What happens if you make one of the lights a little dimmer than the other? There are several ways that you can dim the light:
- Use your fingers to partially shade the light.
- Move one of the lights further from the wall than the other. (See the Variations section for an idea on how you can use this technique to estimate the relative brightness of your two light sources.)
- If your flashlight has a focusing mechanism, you can change the focus of the flashlight. Spreading the beam wider will make the light dimmer. Making the beam narrower will make the light brighter.
- Repeat steps 3 and 4 with each pair of lights (i.e., red + green, red + blue, and green + blue).
- With help from your assistant, project all three lights so that their spots overlap. What color do you see where the spots overlap?
- What happens now when you dim one of the lights?
- Keep track of your results in your lab notebook. You can use a table to organize your results.
| Light 1 | Light 2 | Light 3 | Description of Results | |||
| color | brightness | color | brightness | color | brightness | |
| red | full: 10 cm spot with flashlight 30 cm from screen | green | full: 10 cm spot with flashlight 30 cm from screen | — | — | [write your description here] |
| red | dimmer: about 1/3 covered, 10 cm spot with flashlight 30 cm from screen | green | full: 10 cm spot with flashlight 30 cm from screen | — | — | |
| etc. | ||||||
Mixing Colored Lights: Using Food Coloring in Water
- Prepare the three glasses with food coloring solution:
- Fill each glass with water to the same level.
- Add one drop of red food coloring to the first glass.
- Add one drop of green food coloring to the second glass.
- Add one drop of blue food coloring to the third glass.
- Note: if you like, you can use more than one drop of food coloring per glass, but use the same number of drops for each color.
- Wrap each glass with a single layer of waxed paper. The waxed paper will diffuse the light shining through the glass and water, making a more uniform colored light source.
- Position the glasses on a table near your projection wall so that you can shine light through the glasses and make the projected lights overlap.
- Darken the room.
- Now choose two of the glasses, for example red and green. Use two separate white-light flashlights (i.e., no colored filters on the flashlights) to project light through each glass onto the wall. Orient the flashlights so that the projected lights overlap. (To start, each flashlight/glass combination should be the same distance from the wall.) What color do you see where the lights overlap?
- What happens if you make one of the lights a little dimmer than the other? There are several ways that you can dim the light:
- Use your fingers to partially shade the light before it passes through the glass.
- Move one of the glasses further from the wall than the other. (See the Variations section for an idea on how you can use this technique to estimate the relative brightness of your two light sources.)
- If your flashlight has a focusing mechanism, you can change the focus of the flashlight. Spreading the beam wider will make the light dimmer. Making the beam narrower will make the light brighter.
- Repeat steps 3 and 4 with each pair of lights (i.e., red + green, red + blue, and green + blue).
- With help from your assistant, project all three lights so that their spots overlap. What color do you see where the spots overlap?
- What happens now when you dim one of the lights?
- As with the previous experiment, keep track of your results in your lab notebook. You can organize your results in a table similar to the one you used before.
Ask an Expert
Variations
- Choose a different set of three filters for your primary colors. What colors can you produce by mixing with your new set of primaries?
- Use your computer's color picker to see what R, G, B values are needed to produce a chosen color. Can you make a similar color with your flashlights?
- For the experiment with food coloring, another way to change the relative intensity of the colors is to change the concentration of the food coloring. What happens if you dilute one of the colors? Take off the wax paper, then pour out 4/5 of the contents of one glass (red, for example). Refill the glass with plain water. Dry off the outside of the glass, and re-wrap it with wax paper. What color do you get now when you mix light shining through all three glasses? What change do you need to make in order to produce white light by combining light projected through each of the three glasses?
- Do background research on the "inverse square law" to learn how the intensity of a light changes with distance from the light source. Use what you learned to measure the relative brightness of the lights you mix to obtain different colors.
- For a more advanced color-mixing experiment using red, green, and blue LEDs, see the Science Buddies project Color Mixing with Red, Green, and Blue LEDs.
Careers
If you like this project, you might enjoy exploring these related careers: